Connect ConvesioPay
to Checkout Champ
A clean, step-by-step walkthrough for connecting ConvesioPay to Checkout Champ / Konnective for live payment processing. Written for every experience level — follow it top to bottom and you'll be taking payments through Convesio by the end.
Overview
Three stages: create a connected integration in ConvesioPay, wire that integration into Checkout Champ, then run a quick test on your funnel before going live.
- Step 1 — Generate a Connected Integration + secret key inside the ConvesioPay portal.
- Step 2 — Activate ConvesioPay in Checkout Champ, fill in your details, and connect your account.
- Step 3 — Batch-assign the Convesio gateway to your offers and test on your funnel.
What you'll need
Portal access
Login to the ConvesioPay portal and to Checkout Champ / Konnective.
Master user login
The master ConvesioPay Dashboard email & password. Added-user logins won't work.
Your funnel details
Your Checkout Champ funnel URL, Shopify store URL, and support phone & email.
Statement descriptor
From the Compaytence team, or the Convesio Portal under Support Details.
Have your secret key ready to save
In Step 1 you'll generate a secret key that is shown only once. Before you start, have somewhere secure to paste it (a password manager or your team's secure vault).
Set Up a ConvesioPay Connected Integration
First, create the integration inside ConvesioPay and generate the secret key you'll use to link the two systems.
-
1
In the ConvesioPay portal, go to Advanced Settings and select Connected Integrations.
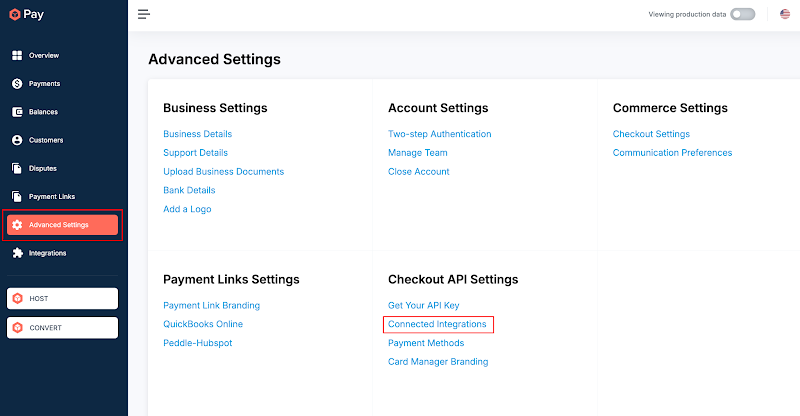
Fig 1 · ConvesioPay → Advanced Settings → Connected Integrations -
2
Click Create New Integration in the top-right corner. Enter a name for your integration and write it down — you'll need this exact name when connecting to Checkout Champ / Konnective.
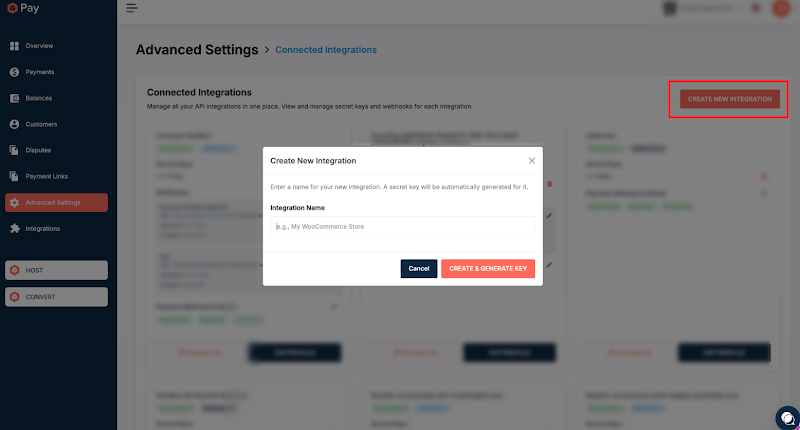
Fig 2 · Creating and naming a new integration -
3
Click Create & Generate Key. A popup will display your secret key.
Save this key now
The secret key is shown only once and cannot be retrieved later. Copy it somewhere secure before closing the popup.
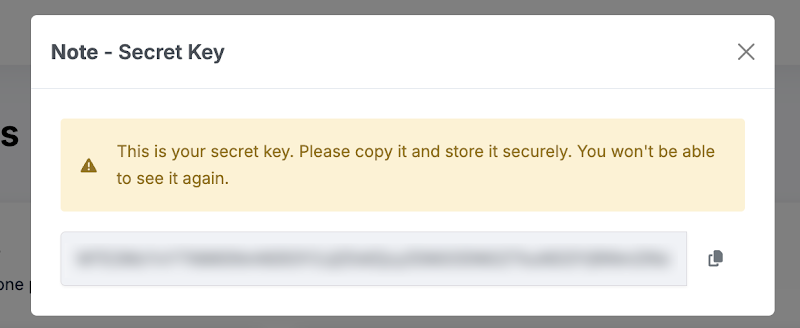
Fig 3 · The one-time secret key popup
Bottom Line
You now have a named integration and a saved secret key. Keep both handy — they're the bridge to Checkout Champ in Step 2.
Connect ConvesioPay to Checkout Champ
Now activate ConvesioPay inside Checkout Champ / Konnective, enter your business details, and link your account so the two can talk.
-
1
In Checkout Champ / Konnective, select Gateway Integration from the left sidebar. Search for Convesio, choose the ConvesioPay icon from the list, and click Activate.
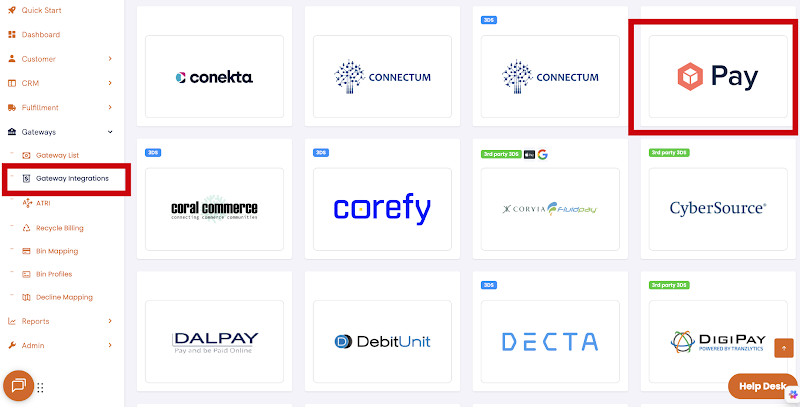
Fig 4 · Activating ConvesioPay in Gateway Integration -
2
Fill in the required fields using the reference below.
Field What to enter Title The Integration Name you created in Step 1. Domain Your Checkout Champ funnel URL — e.g. get.domain.comorcheckout.domain.com.URL Your Shopify store URL. Customer Service Your support phone number and support email address. ISO convesio payDescriptor Your Statement Descriptor (see the note below). Don't have your descriptor? Get it from the Compaytence team, or find it in the Convesio Portal: Advanced Settings → Support Details (under Business Settings). It appears there as the Statement Descriptor — enter that value into the Descriptor field.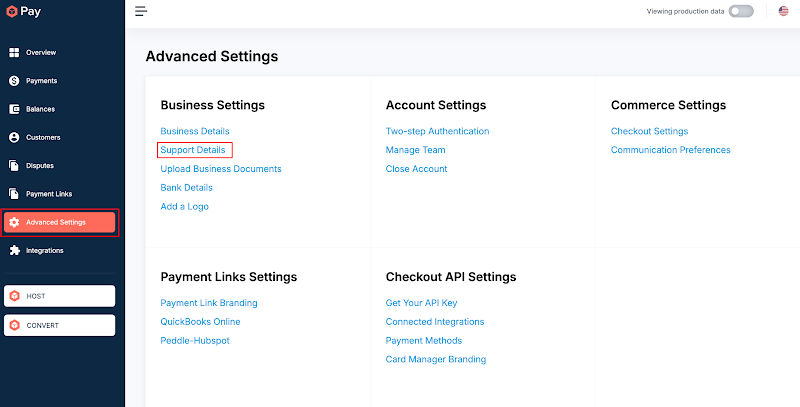
Fig 5 · Finding the Statement Descriptor under Support Details -
3
Click the green Create Gateway button in the bottom-right.
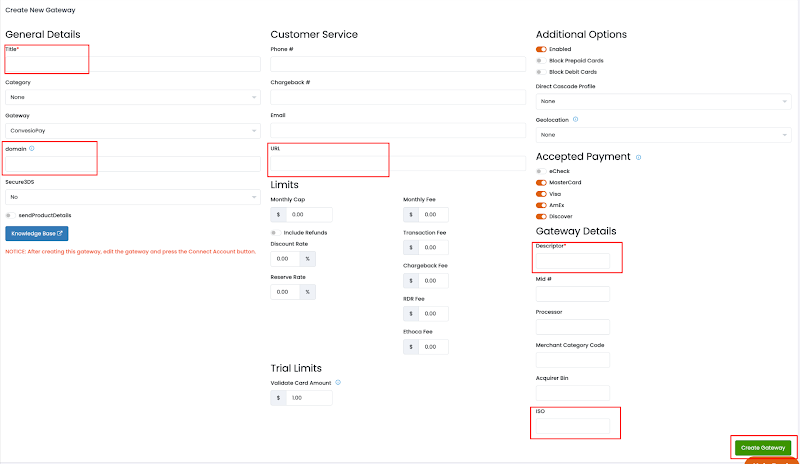
Fig 6 · Create Gateway -
4
Once the gateway is created, edit it: click the blue edit button on the gateway you just made.

Fig 7 · Editing the new gateway -
5
In the gateway edit view, turn on the Send Product Details toggle (
sendProductDetails). This is now mandatory for compliance — product details must be sent on every transaction — and it's what lets Convesio receive the transaction data. -
6
Click the new Connect Account button that appears. The Generate ConvesioPay API Credentials section opens up.
Enter the email and password you use to log in to the ConvesioPay Dashboard, then click Submit.
Use the master account
This must be the Master User's ConvesioPay login. Added-user credentials will not work here.
-
7
The secretKey will now display — the integration is connected. Click the blue Update button in the bottom-right corner to finish.
Bottom Line
ConvesioPay is now activated and connected inside Checkout Champ. Next, test it before pointing live traffic at it.
Test Your New Integration
With the integration connected, assign the Convesio gateway to your offers and run a test on your funnel before going fully live.
Test on one product first if you prefer
The steps below batch-update all orders to the Convesio gateway. If you'd rather not switch everything at once, assign the Convesio gateway to a single product ID and test that on your test funnel instead.
-
1
In Checkout Champ, go to the CRM section and select Campaigns. Find the campaign where your offers live and click the blue edit icon.
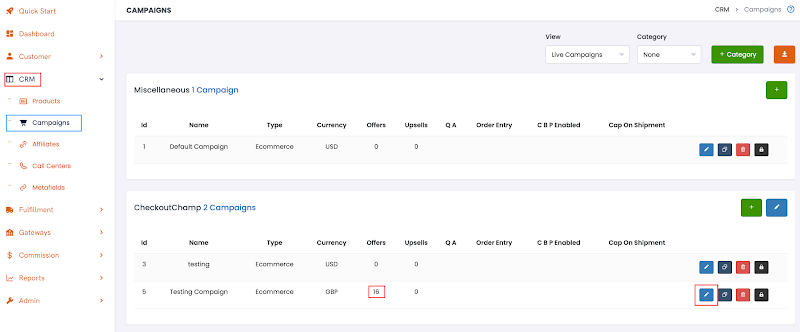
Fig 9 · Editing your campaign under CRM → Campaigns -
2
In General Details, confirm Base Currency is set to USD, then click the blue Save button.
-
3
Go to the Offers section, open the Options dropdown, and click Batch Update.
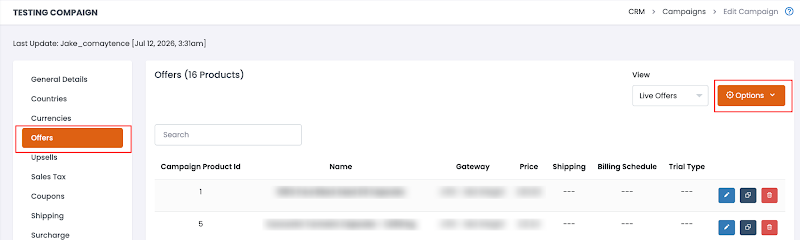
Fig 10 · Opening Batch Update from the Offers options menu -
4
The Batch Update Products panel opens. Click the Update Gateway Account bar, select Convesio in the Gateway Account section, then click Batch Update.
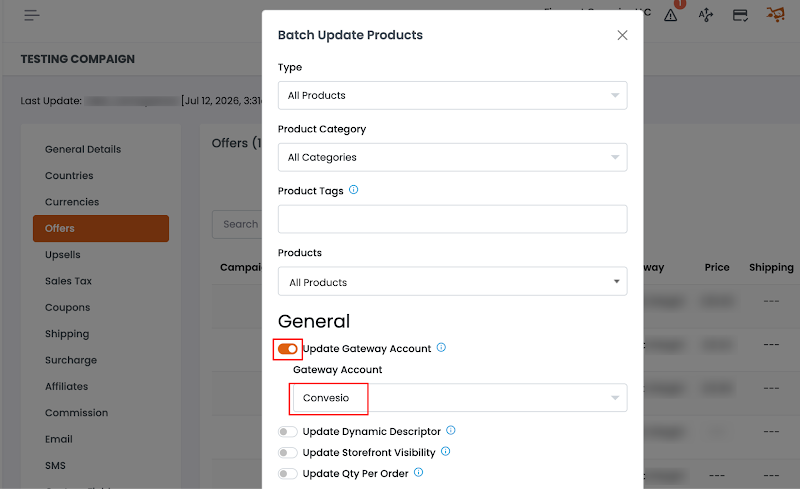
Fig 11 · Assigning the Convesio gateway via Batch Update
You're now ready to test Convesio on your live Checkout Champ funnel. — Compaytence
Need a Hand?
If anything looks different from these steps, or you're missing your statement descriptor, the Compaytence team is here to help.
Reach the Compaytence team
Send over your integration name and the step you're on, and we'll jump in. We can also provide your Statement Descriptor if you can't locate it in the Convesio Portal.
You're set
Integration created, connected, and tested. Convesio is ready to process payments through your Checkout Champ funnel.